OVERVIEW
I ran into an issue recently where I needed to set up Apache Tomcat behind the Apache httpd web server. The book I was referencing was a bit dated, and sources on the web always seemed to leave out a critical piece of information. I'm documenting here, in the event someone might find it useful. Note that this procedure is less about installation (though I touch on it briefly) and more about the actual connection process between the two components.
I assume you are familiar with working around the command line in Linux. All commands here are also performed as root.
Why use Apache httpd as a front-end to Tomcat?
- Clustering/Load Balancing: mod_jk (the module we will use) provides a nice load-balancing feature set allowing you to set up multiple tomcat servers behind the httpd server.
- Security: You can implement security through httpd, which has a more mature feature set, and is well understood by the community. In addition, you have the flexibility to move security settings between tomcat and httpd (where such settings overlap).
- Flexibility: We can leverage the many add-on modules and extensions of httpd.
- Socket Error Handling: Since httpd runs natively on Linux, it has the ability to interact directly with socket errors.
What is the environment we're working in?
We'll be configuring the following:
- Architecture: x86_64
- OS: CentOS Linux 6.8 (This will work equally well on Red Hat Enterprise Linux 6)
- Web Server: Apache httpd 2.2 (using the server built for CentOS 6 from the default yum repo)
- Tomcat: Apache Tomcat 8.5.11, pulled from the Apache website (apache-tomcat-8.5.11.tar.gz)
- Java: Oracle Java 8 (1.8.0_121) downloaded from Oracle.com (jdk-8u121-linux-x64.tar.gz)
INSTALLATION
Java
Install Java, and set the JAVA_HOME environment variable in root's .bash_profile:
JAVA_HOME=/usr/java/jdk1.8.0_121
PATH=$PATH:$JAVA_HOME:$HOME/bin
export PATH
As you can see, I simply uncompressed the tarball into /usr/java (thus bypassing fully the 'alternatives' functionality. If you are not aware of alternatives in RHEL/CentOS - read up on it; it's pretty interesting from a flexibility perspective). There are plenty of tutorials on the web for Java - seek one out if you have issues.
Apache httpd
We're using the stock httpd that comes with RHEL/CentOS, so it's really as simple as:
# yum install httpd
Tomcat
Drop the Tomcat tarball into /usr/share, then extract it (from within the same directory):
# tar -zxvf apache-tomcat-8.5.11.tar.gz
# rm apache-tomcat-8.5.11.tar.gz
This will create a directory /usr/hare/apache-tomcat-8.5.11 containing all of the files required for tomcat. Once done, we remove the tarball. It is no longer needed.
We also need a start/stop script for tomcat. Every good service should have a start/stop script for management.
# cd /etc/init.d/
# vim tomcat
Paste in the following:
#!/bin/bash
# description: Tomcat Start Stop Restart
# processname: tomcat
# chkconfig: 234 20 80
if [ "$JAVA_HOME" == "" ]; then
JAVA_HOME=/usr/java/jdk1.8.0_121
export JAVA_HOME
PATH=$JAVA_HOME/bin:$PATH
export PATH
fi
CATALINA_HOME=/usr/share/apache-tomcat-8.5.11
case $1 in
start)
sh $CATALINA_HOME/bin/startup.sh
;;
stop)
sh $CATALINA_HOME/bin/shutdown.sh
;;
restart)
sh $CATALINA_HOME/bin/shutdown.sh
sleep 1
sh $CATALINA_HOME/bin/startup.sh
;;
esac
exit 0
and save the file. Next we make the file executable, add it to chkconfig and test.
# chmod +x tomcat
# chkconfig tomcat on
# chkconfig --add tomcat
# chkconfig --level 234 tomcat on
# chkconfig --list tomcat
# service tomcat start
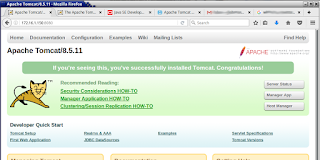
At this point you should be able to browse to the host on port 8080, and see the tomcat page:
 |
| We have validated that Tomcat is up and running. |
If there are any issues, search for "Exception" in /usr/share/apache-tomcat-8.5.11/logs/catalina.out.
CONNECTING HTTPD AND TOMCAT
First, we need to find the mod_jk.so module. For the newcomer, this can be a little challenging, since many of the links to the binaries provided on the tomcat site link only to Windows versions, and the name of the binary listed is not mod_jk.so (as one might expect). I'm using the binary version, and pulled my version from
HERE. Given the versions of middleware components specified above, you'll want mod_jk-1.2.31-httpd-2.2.x.so.
The following will download the file, name it appropriately, and drop it in the correction location:
# wget https://archive.apache.org/dist/tomcat/tomcat-connectors/jk/binaries/linux/jk-1.2.31/x86_64/mod_jk-1.2.31-httpd-2.2.x.so
# mv mod_jk-1.2.31-httpd-2.2.x.so mod_jk.so
# cp mod_jk.so /usr/lib64/httpd/modules/
# chmod 755 /usr/lib64/httpd/modules/mod_jk.so
Next, we need a configuration file for httpd to tell it about the module, and it's settings. Note that this file should go into the conf.d directory for all httpd add-on configuration files (default: /etc/httpd/conf.d/)
vim /etc/httpd/conf.d/tomcat.conf
Paste in the following:
# Load the module
LoadModule jk_module modules/mod_jk.so
# Where to find workers.properties
# Update this path to match your conf directory location (put workers.properties next to httpd.conf)
JkWorkersFile /etc/httpd/conf/workers.properties
# Where to put jk shared memory
# Update this path to match your local state directory or logs directory
JkShmFile /var/log/httpd/mod_jk.shm
# Where to put jk logs
# Update this path to match your logs directory location (put mod_jk.log next to access_log)
JkLogFile /var/log/httpd/mod_jk.log
# Set the jk log level [debug/error/info]
JkLogLevel info
# Select the timestamp log format
JkLogStampFormat "[%a %b %d %H:%M:%S %Y] "
# Send everything for context /examples to worker named worker1 (ajp13)
JkMount /examples/* worker1
Save the file and exit vim.
Finally, we need to configure Tomcat with the settings for the worker that we referenced in the tomcat.conf file. This file should be located in the same directory as the main httpd server configuration file, httpd.conf.
vim /etc/httpd/conf/workers.properties
Paste in the following:
# Define 1 real worker using ajp13
worker.list=worker1
# Set properties for worker1 (ajp13)
worker.worker1.type=ajp13
worker.worker1.host=localhost
worker.worker1.port=8009
Save the file, and exit vim.
We'll do a quick config test, then restart both services to pick up the changes, and perform a full test:
# apachectl -t
# service httpd restart
# service tomcat restart
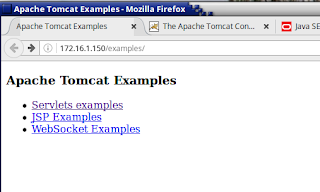
Browse to http://<server-name-or-ip>/examples/
You should see the following:
 |
| The main Tomcat examples page, brought to you by Tomcat |
So how do we know the examples page is being handled through Apache httpd? Note in the URL, the lack of a port # (8080 was the port we configured tomcat to run on earlier, and was required). When we specified "examples/" as our desired URL, and left off the port 8080, the request went to httpd on port 80, httpd used mod_jk and it's associated configuration files to discover that tomcat is serving up "examples", and then forwarded the request along. Tomcat responded with the page, which was then returned to the browser by httpd.
---
In the
NEXT POST, we will secure access to the Tomcat servlets using HTTPS.
REFERENCES


