Sunday, April 23, 2017

Shooting the Sun - 2 (and Jupiter, too)

Last night was the first clear night since the last of my astrophotography parts came in, so I went out to do some imaging. I started yesterday with some afternoon shots of the sun. They were good as far as the exposure, but a little blurry. One of the features of my Sony camera I was interested in is the Manual Focus Assist. Basically, it enlarges the image on the screen for a few seconds to allow you to work on the focus before putting the entire image back in the frame. As it happens, the function does not work without a lens attached.

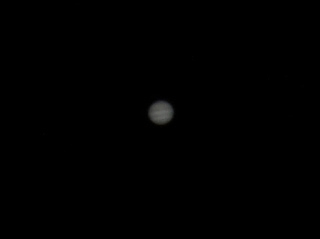
Later in the evening, I decided to check and see where Jupiter was in the sky, and sure enough, it was right over head around midnight. Initially the intent was just to observe through the telescope. Once I saw its moons, however, I could not resist. I set up the camera again, and went back out. The first round was around 9:00 p.m. CDT. I took some decent images, but they were all washed out. Jupiter was a white fuzzy circle, and the four largest moons were fuzzy, as well. I decided to try again, this time around 10:30 p.m. I shot around 60 images, adjusting the ISO and shutter speed for each shot. When I got those onto the computer, every one was out of focus. I set the focus as best as I could once, a the beginning of the session, and I just couldn't get close enough to get it spot on. I threw away that entire batch, and went out once more, this time at 1:00 a.m. I shot varied ISO/shutter speed combinations this time as well. But, this time, for each combination, I shot three images, refocusing each time. It took longer, but at least there was a chance of getting one good one for the ISO/shutter speed combination. Here are two images I ended up with.

In this image, Jupiter is washed out, but we can see its four largest moons quite nicely. (from left to right: Europa, Callisto, Jupiter, Io, Ganymeade)

Here we see a much better image of Jupiter, but the moons are not very visible. On the original 20Mp image, they take up only a few pixels, and are rather dark.

Today, the sky was beautifully clear, so I thought I would give Sol another shot (pun totally intended). The first challenge I ran into was the angle. It seems even in April, the sun is high enough in the sky that you need to really tilt the scope up. Since I don't have a tripod yet, I'm using bricks as a stand for the scope. I put an extra block underneath the scope to get the angle I needed.
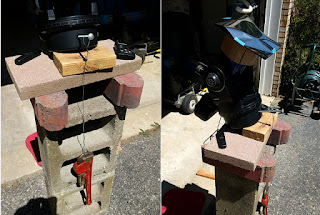
Telescope stand when you don't have a tripod. The pipe wrench made a suitable counter weight.
So, I slid a 2x4 block underneath the front of the scope. That provided the angle I needed, but now the the camera was pulling on the telescope, and it was no longer safe. Solution: bailing wire and a pipe wrench. The sockets used for the table mount are 1/4-20 threads, so I found a 1/4-20 threaded bolt in the workbench, and screwed it into the front of the scope. Next, I hung a pipe wrench from it using a piece of bailing wire. It was enough to keep the front solidly on the wood block, and solar imaging ensued.

I applied the same technique from last night: vary the ISO and shutter speed, refocusing for each image. I came up with some really good shots. ISO of 800 and above for this application were entirely too high - it left a washed out image that could not be post-processed into anything usable. 400 was good, and I think ISO 200 was best.
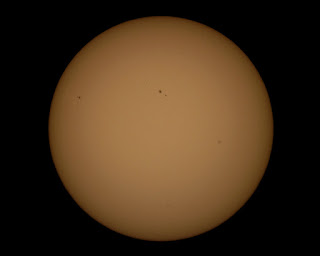
Image of the sun through my telescope using a solar filter.
As far as the equipment, I use a Meade ETX90EC scope. Mead makes a T-mount adapter that allows one to affix a camera to the back of the scope. It's a #64 T-mount Adapter. For the camera, I'm using a Sony a3000, on Manual, with the 'lens-removed' setting enabled. I picked up a cheap shutter release for under $10 to fire the camera. These would not be possible without that shutter release.

Friday, April 14, 2017

Caja: Check MD5sum in a Context Menu

This post applies only to the Caja file manager. It's used in Linux Mint, and likely other distributions.

Why Calculate an MD5 Checksum?

Free software is available all over the Internet. An unfortunate side effect, however is that you download something that has been surreptitiously replaced with malware, or other such malfeasance. Also, minor disruptions in data transfers have the ability, rare as it is, to cause a deformed packet, which still makes it past basic error checking mechanisms. So we want to validate files that we download to ensure they are reputable, and unchanged from the originals. Reputable websites that offer downloads will often display an MD5 checksum value (a string of characters and digits), typically placed near the download link. You will usually see the code preceded with "MD5: ", "md5sum: ", or similar. This code is calculated based upon the contents of the file that it represents, and if you perform an MD5 checksum of the file on your computer, it should match what is displayed on the website.

Why Wouldn't You Calculate an MD5 Checksum?

There are a few reasons we don't do this. First, many sites don't provide an MD5 checksum value. There's not much we can do about that, other can contact the website owner and request one. Even when there is a checksum value displayed, it's cumbersome, and it takes time for larger files. You have to open a terminal shell locate the file, run the md5sum command... In a word, it's inconvenient. This is where cajamd5 comes in. This is a small shell script that you can add to the Caja file manager to make checking an MD5 quick and easy.

Creating the Script

First, we need to write our script. Open your favorite text editor, and type in the following:

#!/bin/bash

for file in $CAJA_SCRIPT_SELECTED_FILE_PATHS
do
  # Begin calculating the md5 sum of a file.
  md5sum "$file" | tee >(cut -d ' ' -f1 > /tmp/sum) |zenity \
         --progress --title="MD5sum" --text="Calculating MD5 \
         for:\n${file##*/}" --pulsate --auto-close

  # This block exits the operation if the user clicks Cancel.
  if [ "${PIPESTATUS[2]}" -ne "0" ]; then
    rm /tmp/sum
    exit 0
  fi

  # Calculation is finished, so display the result.
  sum=$(cat /tmp/sum)
  zenity --info --title="MD5sum" --text="MD5sum : $sum\nFile : \
        ${file##*/}"
  rm /tmp/sum
done

exit 0

Save the file in your home directory as with the name cajamd5.

Preparing the Script for the Menu

This is pretty simple, actually. All we need to do is make the script executable, then copy it into a directory Caja uses for scripts. To do this, Click the Menu, then Terminal.
In the terminal, type in the following (just what's in bold):

you@computer ~ $ chmod +x cajamd5
you@computer ~ $ mv cajamd5 ~/.config/caja/scripts
you@computer ~ $ exit

That's it. You can now calculate an MD5 checksum on any file from within the graphical Caja file manager.

Below is a quick step-by-step of checking an MD5 sum. You'll want to click each image to get a better view.

When you right-click on the file, the context menu appears, and you now have a Scripts option at the top, with our new script in it. Just left-click the cajamd5 item.


This automatically starts the md5 sum calculation against the file you selected.


After a short period of time, a new window is opened displaying the MD5 sum for the file, and the file name. If you compare the value in the cajamd5 box with the MD5 sum under the second item in the list, you'll see they are the same.


All done. We can now ensure the files we download are what the publisher intended, quickly and easily.

One small note: Caja will allow you to select multiple files, and calculate MD5 sums on all of them with one click of the cajamd5 script. This is done one file at a time. Normally it's not a big deal, but if the files are large (such as multiple .ISO images), this can take a while.

Credits:
  • Ethan J. Eldridge provides a basic script on his blog to execute an action in Caja.
  • Belham2 posted the code for calculating the MD5 sum, and displaying in a window on the Solus Project forums.