Saturday, December 9, 2023

My Keyboard Project - Part 2

PART 1 ~ PART 2

The PCB/bezel kit came in, and good news. The stabilizers are already installed, and lubricated. The keys were pre-lubricated, also, so that speeds things greatly (and I've heard lubricating switches can be a tedious task).


The disassembled keyboard includes the bottom half of the housing with battery, the printed circuit board (PCB) with stabilizers, foam padding, and finally the metal plate at the bottom There is also a bezel not shown above.

INSTALLATION

Before fully assembling the keyboard, one thing I wasn't sure about was the inside of the case. I took a look, and it was a rather open chamber underneath the PCB. I took some leftover foam from a flooring job we did and cut it into three layers of strips that could fill the empty space. With that, it was time to assemble. First the keys, then (after a wait due to an ordering problem), the keycaps. I also applied my own logo. When installing the key switches, I opted not to use the plastic spacers running around and rather see how they fit first. The Gateron switches snapped in perfectly. No need at all of spacers.

The foam padding provides additional sound deadening. It's cut into strips as there are ribs running horizontally across the bottom of the keyboard housing.


Iblancod C87 with Gateron red switches.
 

The keycaps fit rather snugly, and were easy to install. They too, feel a little cheap, but they were the lowest-priced caps I could find on AliExpress, so yeah - cheap. I'll upgrade to something nicer later.

The mostly completed keyboard with the keycaps installed.


The keyboard has been in use now for a few months, and I love it. I did notice one additional annoyance. Every now and then, I would feel like maybe I hit the CapsLock key, but no status changes on the keyboard. The next time I look up, I would see that I did hit caps lock. Looking back over the board, I saw the obvious design flaw. The LED for the CapsLock switch is located "on" the PCB. The top surface of the bezel sits approximately 1/2" above the LED. The space in between is filled with a black hallow tube leading down to the LED. As the inside of this tube is black, it reflects only a tiny fraction of the light being produced. If you want to see the light, you need to have your eyes hovering directly over the LED, which is clearly not practical. So, I took a hot-glue gun and made some elongated teardrop shaped drips of glue. I then fitted them into the center of the tube and marked where they stopped. I then cut off the top (wider part) of the teardrop, and fitted them back into the tube until they were flush with the surface of the bezel. When dry, the glue allows enough light through to be able to easily see if the LED is on, but also spreads out the light into more directions, so it can be seen from any angle.

The semi-transparent glue helps to spread out the light in all directions, making it easier to see.

That brings us to the next problem I noticed. For whatever reason, this poor typing of late has also manifested with the symptom of hitting two keys when I intended only one of the two and double-tapping keys much more frequently. If you think step-by-step at what happens when we copy and paste text using just the keyboard, double-tapping a key can be really problematic. Well, as it happened, I had done a lot more reading about different switch types, and when I purchased a set of Red Dragon red switches, they also threw a set of five or so other switch samples. I decided that what I needed was a switch that was tactile like the blues, but quiet like the reds. From that set of extra switches, I found that both the brown, and the purple fit the description. The purple seemed like it required just a tiny bit more force than the brown, so I decided on those (later research confirmed that this was the main difference between the two).

They came in the mail on a Saturday, and I had them in the board before dinner. One significant issue with the purple switches, however. The pin on the right (when looking at the switch from the top, as if inserted into the PCB) is significantly thinner than the one on the left. While swapping out switches, I ended up bending 4 pins and having to replace the switches. (This is, by the way, why I buy a pack of 100 switches for an 87-key layout). Looking back, the sample switch that came with the Red Dragon reds was an Outemu purple, not a Red Dragon purple. A bit of looking around reveals that the thin pin is specific to Outemu switches and housings. (Red Dragon branded switches are manufactured by Outemu.) I found it odd that I didn't run across this in pairing the switches to the hot-swap mounts, but something to keep in mind for the future. I am also considering looking for a slightly stronger set of springs. That could also help with double-tapping, though possibly at the expense of keyboard fatigue.

The new purple switches have a tactile feel without the loud click.


I have definitely noticed a small improvement in my typing, and significantly less double-tapping of keys. I keep the back light set at low with a color like a faint violet (the closest to white I can get), and the transition from a light background to dark is perfectly seamless - the keyboard always seems to have the right amount of light for my liking. The tactile feel is really unpredictable with the Outemu (Red Dragon) purples. If you press on the key while pulling slightly toward yourself, the feel is different that when you press while pushing the key away from you.

So, the question is, will I build the next one? Probably not. The discount you get on ordering in smaller quantities is lost when you add in shipping. Since most boards in the $50-75 range are pretty nice, it's hard to justify building one with the essentially same feature set. What you do get, however, is the ability to build something with your requirements in mind. Having gone through that once, I don't think building is really the best route for me going forward. From this experience, I know what works for me, and what doesn't. If I need another in the future, I'll pick up something that already has what I want (and maybe macro support, too), and pay less for it.


Saturday, August 26, 2023

My Keyboard Project

PART 1 ~ PART 2

OK, so I decided it was time to jump down into the rabbit hole, and build my own keyboard. l chose AliExpress to get all of the parts. All told, with shipping, the total cost was about $100. The first set of shipments have arrived. These included the switches (Gateron reds), a switch puller and opener, the USB-C cable, lubrication, stabilizers and o-rings. I already had the keycap puller and brush.

Start of the kit. I still need the keyboard housing and key caps.

The tweezers and smaller silver key puller came with the keys. I opted for the 100 count cup of keys to ensure I had some extras in case any were bad. Here's a closeup of the key switch:

Gateron red switch

The white base has a clear area that will allow light from the board-mounted LEDs to shine through the clear plastic top. This makes the switches cheaper (since they don't need the added LEDs), and helps to ensure whatever software on the keyboard's processor is well integrated with the lights (as they come as a set). It's also surprisingly quiet. I do still need to test and lubricate each switch.


Monday, July 31, 2023

Day Hike: Potato Creek State Park, Redeux

My last hike of significance was back in November at Potato Creek State Park. I wanted to go back and see the park in the summer, and yesterday I did just that.

This time, I added some additional distance, by taking trail 1.


A view across the lake


The Shrader Springhouse
 

One of a number of boardwalks protecting the wetlands


Trails are well-marked and feature an incredible amount of foliage this time of year.


Saturday, November 12, 2022

Day Hike: Potato Creek State Park

Potato Creek State Park is located just southwest of South Bend, IN. It has facilities for camping, hiking, fishing, and horseback riding.

Despite the cold and rainy weather, I took the day to hit trails 4 and 2. Shortly after starting out, I disturbed a blue heron on the lake. The remainder of the train was uneventful. Some parts of the trail are paved or stone-covered. In spite of the wet weather, there was very little mud - only one spot about 6 feet long. There are also numerous lookouts built where one can observe wildlife (season permitting). Now that the leaves have dropped, much of the horizon and sky were various shades of gray. On the floor, however, there were numerous small ground cover plants which revealed a beautify green carpet for most of the hike.

Overall, It was a really nice walk, and I expect I will visit again in the warm weather to see the park in the warmer months.


Distance: 7.33km

Elevation Gain: 128m

Temperature: ~41 deg. F

Time: ~2 hours


Friday, June 24, 2022

"A History of Us" Released

After years of research, writing, and editing, the first volume of my family history is complete.


While having provided technical assistance to my mother when she was working on the Landers family history, I was more focused on work and social life to have taken up the cause. That changed when I attended a memorial service for my uncle, Jim Taylor. I realized that I had very little knowledge of my family's past, and that my children knew even less. I was also unhappy with some works produce on my maternal side. I decided that a well-researched survey was needed. This book is the beginning of that effort. The original plan was for a simple referential-style work that consisted of one page per person, with just basic facts about that person, their spouse, and children. Given the richness of the stories I was reading, I soon realized that format would not adequately portray our past. The book grew and developed along the way into its current form which is more narrative, and includes additional sections on "Further Research" and "Name Origins."

Additional contributions were made by Pat Taylor, Paul Hargrove, Paul Pomerleau, and Sydney Lohman.

From the back cover:

A History of Us: The Hargrove, Wright, Dalton, and Stroud Families documents the ancestry of Lynn Paul Hargrove dating back to 1474. Coverage includes 126 families from as far away as Fifeshire in Scotland, Yorkshire in England, The Palatinate, northern Switzerland, France, and Italy. Prominent surnames in the family include Basse/Bass, Cox, Hargrave/Hargrove, Lawrence, Seibert/Sibert, Stäffen/Stephens, Vasser, and Wright. In addition to family histories, the book describes general cultural notes and key historical events that shaped how the different families worked their way through history to the present day. Specifically, attention is given to the rise of the merchant class in England, various wars fought in the Palatinate, the Powhatan Uprising, the Fort Seybert Massacre, and the Flood of 1937.

The contents:

Acknowledgments
Introduction
Pedigree
FOREIGN ANCESTORS
    English Ancestors
    Swiss & German Ancestors
    Scottish & Irish Ancestors
    French & Italian Ancestors
THE IMMIGRANTS
    The Journey
    English Immigrants
    German Immigrants
    Scottish & Irish Immigrants
    French Immigrants
AMERICAN ANCESTORS
    Hargrave & Harrell
    Cox
    Basse/Bass, Griffin, & Harris
    McGehee, Watkins, & Wright
    Scarborough, Stewart, & Hobbs
    Carr, Kirby, Murphey, Perkins, & Vasser
    Stephens
    Sibert, Wright, Hobbs, & Stephens
    Dalton & Stroud
    Hargrove & Elmore
    The Contemporaries
Name Origins
Further Research
Name Index

A History of Us is available on Lulu.com, amazon.com, and bn.com.


Friday, November 26, 2021

High-performance Sub-netting

I wrote the following article back in 2009 while I was working on my Cisco CCNA certification. I just ran across it, and though to post it here. Enjoy!


Overview

This page describes a process for subnetting. With minimal preparation (the creation of a table), an understanding of the process, and a few hours practice, you should be able to subnet any IP address/mask (or prefix) in under 60 seconds. The end result of this will be the network address, broadcast address, and valid IP address range for hosts.

Prerequisites

There are a few things you must have a good grasp of in order to get through this process. These are listed below:

  • Address classes (A, B, and C): Knowing the address class will help you pick the appropriate row in the table from which you will be working.

  • Interesting Octet: The "interesting octet" is octet of the address that we are working with. For an IP address such as abc.def.ghi.jkl, def is the second octet, ghi the third, and jkl the fourth. This is essentially where we are replacing values to differentiate between a network number and a host address. For example, given the IP address and prefix 163.45.18.29/21, the interesting octet will be the third octet (with the 18) as that is where most of the work in subnetting takes place. We determine this by looking at the prefix, and identifying the row in the table in which the prefix is found. If this seems unclear, we'll be working with exercises below that will help. A few other notes about the interesting octet: 1) the first octet (with the 163) is never the interesting octet, 2) the interesting octet is usually determined by the address class (the second octet is the interesting octet for class A addresses, the 3rd octet is the interesting octet for class B addresses, and the 4th octet is the interesting octet for class C addresses).

The Table

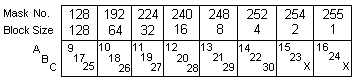
The following table is used to do the subnetting:

The bottom row lists address prefixes. When given a prefix in the problem, you can look it up here to determine which column you're working in. In addition, prefixes will tell you what the interesting octet is. If the prefix falls in the A row, the 2nd octet is the interesting octet. If it falls in the B row, the 3rd octet is the interesting octet. Finally, if it falls in the C row, the 4th octet is the interesting octet. The top half contains two rows. The top row lists the subnet mask value that will appear in the subnet mask. If you are provided a subnet mask instead of a prefix, you can look at the last octet in the mask before the zero to see which column in the table you're working with during the process. The second row lists block sizes. This is the size of the block of addresses that the address/prefix provides. Subtracting 2 from this number will give you the number of valid host IP addresses in the block. There are other tables out there that you can use for a similar process. I chose this one because of how the exams are administered. You are generally provided two sheets of laminated paper, and a dry-erase marker for the exam. There is not a lot of room (or time) to write large complex tables.

The Xs: In the last row, you will notice two Xs. This is because you cannot subnet an address down to this level. With a /30 prefix, the block size is 4, leaving a network address (1) a broadcast address (2) and two valid host IP addresses (3 and 4). If you attempt to subnet further with a /31 prefix, this would result in a block size of 2, with one for the network address, one for the broadcast address, and nothing left for host IP addresses. There is a /32 mask that is valid, however that is unrelated to subnetting.

The Process

OK. Enough of the talk. Let's do a few exercises to see how this works.

We begin with the IP address provided above and a prefix, 163.45.18.29/21.

  1. Write down the ip address and prefix on a sheet of paper:


  2. Look up the prefix number (21) in the bottom half of the table. It falls in the 5th column, so we will be using that column of the table for the remainder of the exercise. At this point we can already make some useful notes about the address. First, we see that it falls within the class B range. This means that the first two octets will be unchanged (and as such, I do not write them down on the piece of paper), and the 3rd octet is the interesting octet, because the prefix (21) falls on the middle row in the bottom half of the table. We also know, by looking at the top row, that the value in the interesting octet of the subnet mask will be 248 (hence, a mask of 255.255.248.0). Finally, we know that the block size we're working with is 8. More on this in the next step. At this point, I usually write the block size above the interesting octet, so I can keep track of where I am at:


  3. Now, we figure the network and broadcast addresses. To do this, we go back to the block size. The block size determines where network addresses start, and is an incrementing value in the interesting octet. Our goal is to find the network number that supports the provided IP address. To do this, we count incrementally in the interesting octet until we reach the host address number (without passing it). in this case, we count as follows:


    163.45.0.0
    163.45.8.0
    163.45.16.0


    At this point, if we increment again, we will pass the value in the third octet, so we stop, and we are left with the network number: 163.45.16.0. Write this down:


  4. Now, we need to find the broadcast address. This is probably the most difficult part to explain, but after some practice, it will become very intuitive. First, we increment the interesting octet one more time (passing the host address value for that octet) and subtract 1. The next number in that octet (incrementing by the block size) is 24, minus 1 is 23. If this were a class C address (and we were working in the 4th octet), we would be finished. For class A and B addresses, we need to fix octets to the right of the interesting octet. To do this, we throw a 255 in each remaining octet to the right of the interesting octet. In this case, we place 255 in the 4th octet, and we have our broadcast address, again, written down to keep track of where we're at:


  5. All that is left is to find the valid IP address range; that is, the range of addresses that can be assigned to hosts in the network. To do this, we increment the network address by 1, and decrement the broadcast address by 1. The first valid IP address is obtained by adding 1 to the number in the 4th octet of the network address, and the last valid IP address is obtained by subtracting 1 from the 4th octet of the broadcast address. Thus:


    First valid IP = 163.45.16.[0 + 1] = 163.45.16.1
    Last valid IP address = 163.45.23.[255 - 1] = 163.45.23.254.


    Again, write these down to keep track of where you're at:


And there you have it. You've subnetted an IP address to find the network address, the broadcast address, and the valid host IP range.

Another Exercise

Let's do another exercise. This time, we will use an address that falls in the Class A range, and we'll assume that we were given an address and mask (instead of a prefix). The address we want to find subnet information for is 89.65.129.68 with a 255.240.0.0 subnet mask.

  1. Write it down:


    How did we know to write the prefix of /12? Simple: Remember one of the prerequisites is that you have to have a solid understanding of IP address classes. We know that an address with 89 in the first octet falls in the Class A range. We also know that the last number in the subnet mask before the first 0 octet is 240. We look up the 240 in the top row of the table, follow down that column to the prefixes in the bottom half, and look at the number in the class A row: 12. This is the prefix for the subnet.

  2. Next, get the block size. The block size appears in the lower row of the top half of the table, and it is 16. Remember, this means we have blocks of 16 addresses with two reserved for network and broadcast, leaving 14 for valid host addresses. We also need to find the interesting octet. In this case, it's octet 2, as the second octet is the interesting octet for class A addresses. Write this down:


  3. Now, we find the network and broadcast addresses. Increment in the interesting octet by the block size:


    89.0.0.0
    89.16.0.0
    89.32.0.0
    89.48.0.0
    89.64.0.0


    The next number in the interesting octet, 80 exceeds the host address number, so we stop at 64 for the network number. Write it down:


  4. To find the broadcast address, count up one more in the interesting octet (89.80.0.0), place 255s in all octets to the right of the interesting octet (89.80.255.255) and subtract 1 from the interesting octet to get the broadcast address (89.79.255.255). Write it down:


  5. Now, to find the valid host range, add one to the network address, and subtract one from the broadcast address:
    First valid IP = 89.64.0.[0 + 1] = 89.64.0.1
    Last valid IP address = 89.79.255.[255 - 1] = 89.79.255.254.

...and you're done.

Saturday, February 13, 2021

Senators Voting to Acquit Donald Trump

 A message to the members of the Senate GOP:


Here is the list of the GOP cowards that refused to hold Trump accountable, and when they are up for election. Let them know we expect more from our leaders when their seat comes up for election.

StateSenatorUp for election
AlabamaRichard C. Shelby2022
AlabamaTommy Tuberville2026
AlaskaDan Sullivan
2026
ArkansasJohn Boozman2022
ArkansasTom Cotton2026
FloridaMarco Rubio2022
FloridaRick Scott2024
IdahoMichael D. Crapo2022
IdahoJim Risch2026
IndianaMike Braun2024
IndianaTodd Young2022
IowaJoni Ernst2026
IowaCharles E. Grassley2022
KansasRoger Marshall2026
KansasJerry Moran2022
KentuckyMitch McConnell2026
KentuckyRand Paul
2022
LouisianaJohn Kennedy2022
MississippiCindy Hyde-Smith2026
MississippiRoger Wicker2024
MissouriRoy Blunt2022
MissouriJosh Hawley2024
MontanaSteve Daines2026
NebraskaDeb Fischer2024
North CarolinaThom Tillis2026
North DakotaKevin Cramer2024
North DakotaJohn Hoeven2022
OhioRob Portman2022
OklahomaJames M. Inhofe2026
OklahomaJames Lankford2022
South CarolinaTim Scott2022
South CarolinaLindsey Graham2026
South DakotaJohn Thune2022
South DakotaMike Rounds2026
TennesseeMarsha Blackburn2024
TennesseeBill Hagerty2026
TexasJohn Cornyn2026
TexasTed Cruz2024
UtahMike Lee2022
West VirginiaShelley Moore Capito2026
WisconsinRon Johnson2022
WyomingJohn Barrasso2024
WyomingCynthia Lummis2026